The winter of 2010/2011 has brought us the most snow that we have seen in years and it’s still January! Sometimes we get a little touch of cabin fever and we need some color in our lives with all of that white covering the ground. I’ve found that my African Violets provide much needed color in my home. They are actually easy to grow and give back so much for a little effort. African violets are such an easy-care plant that in tending them, the “don’ts” far outweigh the “do’s”! Don’t move them, don’t water them too much, don’t fertilize too often, and don’t repot them until they overflow their pots.
Although African violets do like evely moist soil, letting the soil become waterlogged is certain death for them. Overly saturated soil takes up the air-space African violets need to thrive. Since like many plants, the African violet both breaths and drinks through its roots, roots left standing in water deprive the plant of air and it drowns. There is some disagreement on how to water an African violet. Some growers prefer watering from the top. When watering African violets from above, take special care to keep the leaves dry. Water left standing on leaves results in dark spots and rings that are unattractive and shorten the lefespan of the leaf. Many growers prefer to let the plant drink from a saucer or attached plant tray. Still, another method of watering is the wick system. Wick systens and two-part pots give your plants the water they need without leaving them with wet feet or splashing leaves with water. The latter is the method I use for my violets. I purchased some inexpensive self-watering two part pots at Walmart that work great. I just check the water level in the bottom part of the pot once every week or two and the pot does the rest. What could be easier than that? All three types of watering are admissable as long as you don’t get water on the leaves of the plant and water when the soil is about 50% dry or feels dry to your touch.
Don’t use soft water. Tepid tap water or bottled water works fine. Although some African violet growers use distilled water, along with contaminants like chlorine, distilled water is also devoid of minerals and other nutrients that help your African violet grow. If you use tap water, let it sit overnight so that it’s room temperature at watering time. In addition, letting water sit helps to evaporate flouride and chlorine, two of the harmful chemicals your African violet doesn’t need.
Over-fertilizing your African violet can result in as much harm as over-watering your plant. Over-fertilizing can cause leaves to become brittle and crack; it may also produce lesions on leaves and stems and it can curtail your African violet’s ability to absorb beneficial elements, which results in wilting, leaf tip burning, and a decrease in bloom. African violets like to be pot-bound. The less you have to replant them, the happier they are. However, in container gardening, nutrients are depleted quickly and need to be replenished either by repotting with fresh, nutrient rich potting mixture or by adding nourishment to the pot. Only use a fertilizer specially formulated for African violets. The violet requires certain trace elements which aren’t available with an all purpose food, as well as a soil acidifier. African violet food takes care of these needs. A good African violet food is balanced with equal amounts of the primary nutrients, nitrogen, phosphorus and potassium, usually in a 10-10-10 formula. Your African violet food should also be 100% water-soluble so that your plant can absorb the fertilizer’s beneficial elements. However, be sure that your African violet food won’t prove toxic to your plant. Although labeled for African violets, many fertilizers contain impurities that are harmful to it. One component often found in fertilizers is urea, which is a source of nitrogen. Although it is cheaper than other sources of nitrogen, urea causes root burn on African violets, which reduces your plant’s ability to absorb water and beneficial nutrients.
Try several varities of these colorful plants in your window and delight in the joy they bring. Make sure they don’t receive direct sunlight. I have them in my sunroom window that receives afternoon sun and they seem to be quite content there.
- Violets in My Sunroom
Posted in Uncategorized | Leave a Comment »
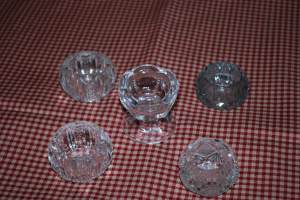
A salt cellar (also called salt or standing salt) is a vessel, usually small and made of glass or silver, used on the table for holding salt. An individual salt dish or squat open salt cellar placed near a trencher was called a trencher salt. The use of salt cellars continued through the 1940′s but has been in decline since, gradually replaced by salt shakers. The small ones pictured above belonged to my grandmother and mother. Years ago, salt cellars such as these were placed by each person’s plate at mealtime. These are a very important part of my collection. Some of these have cut glass patterns around the outside. When my grandmother churned butter and formed it into a round shape, she would take a salt celler and roll it over the top of the butter creating a pattern making it a little fancier for company.
The exterior surfaces of modern cellars are frequently decorated with birds, lemons or other designs, and may have the word “salt” or “S” on them in various languages. A salt cellar often has a lid to protect the contents and keep it dry. The lid may be made of the same material as the cellar, or in a different one (for example, a procelain cellar with a wooden lid). Some salt cellars, also known as salt dips, open salts, and salt dishes, are not true cellars at all, but open dishes without lids. These were used by the wealthy families from the Middle Ages until World War II. The bowl along with a miniature salt spoon, was passed to guests by the head of the household for individual service. It is still possible to find salt cellars today, but they are not used as table decorations. They have lids and are used near the stove so the cook has easy access to salt while preparing meals. These are less likely to be elaborately decorated, and may have a range of designs for ease of use. For example, a salt cellar with a high back containing a hole allows the cellar to be mounted to a wall. The example below from my collection is like this. Another style is a container shaped like a curved tube. The curvatue protects the salt a little, but the cellar is open allowing the cook to reach in and take salt. Salt cellars used to be made of glass,but in recent times can be found in many different media, including porcelain, pewter, silver and wood. Sometime after 1950, salt cellars became a coveted collectible.
In ancient times salt was a precous commodity. Roman legionaries were sometimes paid in salt, the origin of the word salary. In Tibet, according to Marco Polo, cakes of salt displayed a likeness of the ruler and were used as money. In Ancient Greece, slaves were traded for salt; and around 2000 BC the Chinese emperor levied a salt tax. Not only was this the first salt tax, it was the first tax of any kind.
During the Middle Ages, when salt was a valuable comodity, salt would be kept on the table in elaborate metal or glass dishes as a satus symbol. Being granted the favor of sharing the salt cellar of the host was seen as a sign of great respect. The social status of a guest was often measured simply by judging the distance at which the person sat from the master’s large salt cellar placed near the middle of a long table; the phrases above the salt and below the salt alluded to the former custom of seating persons of higher rank above and those of lower rank below that container. In the more recent past, salt was still very costly and precious. For example, before refrigeration, salt was the main ingredient for preserving food.
In the early 20th century, moisture absoring agents (such as magnesium carbonate) were added to salt and it was no longer sold in blocks, but was finely ground. Salt cellars were replaced with salt shakers somewhere around 1950.
Posted in Uncategorized | Leave a Comment »
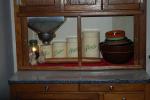
- Center section with flour bin/sifter
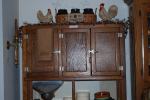
- Top section
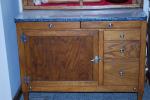
- Pull out work space and bottom section
Posted in Uncategorized | Leave a Comment »
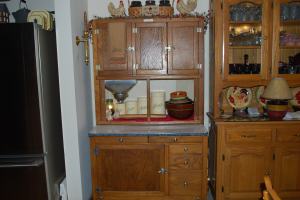
Antique Hoosier cabinets are a popular addition to any vintage look kitchen. The name Hoosier became synonymous with free standing cabinet and counter combinations, although there were many companies that made them. The one pictured here has been in our family for several years and is proudly displayed in my dining room. It once belonged to my husband, Clark’s mother who raised 11 children. She had problems with one of the top doors coming open and Clark’s dad whittled a little button for the door to keep it closed. When we had the cabinet refinished, we gave specific instructions to not remove the button. We wanted to preserve those memories. My step father, Cecil Cooley refinished it for us several years ago and replaced the rusted flour bin and some of the hardware. The cabinet holds bakeware these days. The pull out top is where my family finds the cookie jar and desserts when we have dinner on family Sundays.
The Hoosier cabinet is quite efficient – even in today’s kitchen. The typical Hoosier cabinet consists of three parts. The base section usually has one large compartment with a slide-out shelf, and several drawers to one side. Generally it sat on small casters. The top portion is shallower and has several smaller compartments with doors, with one of the larger lower compartments having a roll-top or tambour. The top and the bottom are joined by a pair of metal channels which serve as the guide for a sliding countertop, which usually has a pair of shallow drawers affixed to its underside. The whole assembly, with the counter retracted, is fairly shallow, about 2 feet deep; the width and height are generally about 4 feet and 6 feet respectively. A distinctive feature of the Hoosier cabinet is its accessories. As originally supplied, they were equipped with various racks and other hardware to hold and organize spices and various staples. One particularly distinctive item is the combination flour-bin/sifter, a tin hopper that could be used without having to remove it from the cabinet. A similar sugar bin was also common in some models. Special glass jars were manufactured to fit the cabinet and its racks. A major manufacturer of the glassware was Sneath Glass Company. Original sets of Hoosier glassware consisted of coffee and tea canisters, a salt-box, and four to eight spice jars. Some manufacturers also included a cracker jar. One distinctive form was a cylindrical jar with a ring molded around its center, to allow it to rest in the holes of a metal hanging rack. On the inside of the doors, it was common to have cards with such information as measurement conversions, sample menus and other household tips. The Hoosier Manufacturing Co. is thought to have been founded in 1898 (though some sources claim 1903). Houses of the period were not equipped with built-in cabinetry, and the lack of storage space in the kitchen became acute. Hoosier adapted an existing furniture piece, the baker’s cabinet, which had a similar structure of a table top with some cabinets above it (and frequently flour bins beneath). By rearranging the parts and taking advantage of (then) modern metal working, they were able to produce a well-organized, compact cabinet which answered the home cook’s needs for storage and working space. Hoosier cabinets remained popular into the 1920′s, but by that time houses began to be built with more modern kitchens with built-in cabinets and other fixtures. Thus supplanted, the Hoosier largely disappeared. They remain common on the antique market, however, and are still used as supplemental cabinets. My daughter has a beautiful example of a Hoosier cabinet with a zinc work space in her kitchen. We will be using an antique Hoosier cabinet as a display piece in the Persnickety Primitives shop. We will also have reproduction Hoosier canister jars available for sale that will greatly enhance the appearance of your antique Hoosier cabinet as well as store your flour, sugar, coffee and tea.
Thanks for visiting and stop back often for more information and pictures on primitive and antique collectibles for your home.
Posted in Uncategorized | 2 Comments »
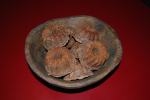
- Pantry cake tarts in treen bowl
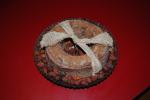
- Large Pantry Cake
Primitive pantry cakes are a wonderful addition to your primitive kitchen or anywhere else in your home for that matter. They are, of course, nonedible decor for your primitive home. Every one is individually designed and created. My recipe is loaded with a lot of wonderful spices. Once they have cooled, I rub on even more spices for maximum grunge and prim personality. The cakes are grubby and primitive and are a beautiful brown color. They have a multitude of decorating options. Add them to a corner on a shelf or on a counter or cupboard in your cooking room or Gathering room for the warm, comforting scent of baking spices and a touch of prim. Tucked into the corner of a Pie Safe, they are simply beautiful. They are a very long lasting prim decor. And the fragrance . . . memories of Granny’s kitchen will come flooding back every time you get a whiff! Some of the recipes call for adding waded up aluminum foil to the center of the cakes to allow the mixture to dry better and thus prevent molding over time. If you do not add the foil in the large cakes, you will have to bake them much longer. The foil is not necessary in the small tart size. Place your cake in an old tin and surround them with rosehips for a beautiful display. The first recipe is the one I used and the second is a little different variation with fewer spices inside. Don’t forget to rub spices on the outside for more fragrance!
Primitive Pantry Cakes
4 tbs used coffee grounds (or more, depending on darkness you want)
1 cup sea salt
2 cups flour
3 tbs cinnamon, plus extra for rubbing cakes
2 tbs ground cloves
1 cup water (more or less depending on consistency of dough)
(use less water if your coffee grounds are wet)
A few drops of scent oil (optional)
Mix dough just until everything is combined and not too sticky. Spray molds with cooking spray, coat with cinnamon, cloves or whatever spices you like. Mold dough into molds making sure the bottom is even. I used brewed coffee instead of water to make the cakes darker. I also painted on melted scented wax to cooled cake for an even older look. Oven temp. is 170 degrees. Remember, you are actually drying the cakes instead of baking them. My small tarts were in the oven for about six hours but my large cake took about 12 hours. Putting a wad of foil in the center would have cut down on the baking time. It is helpful to remove the cake (large ones) every hour and spray lightly with cooking spray and add more spices. After the baking time is up, you could turn off your oven and just let them sit in there.
Primitive Pantry Cakes
1 cup flour
1/2 cup salt
1 cup coffee grounds
1/2 cup cold coffee
Spray the pan with cooking spray. Press the dough all around the inside of the mold (about 1/4 inch or more thick), then wad up foil to fill the middle, then put a layer at the top to cover the foil, making sure the bottom is even. Otherwise, if the whole pan is filled with the dough, it is harder to get dry all the way through and it could get moldy and icky. Then, you bake it in a slow oven (170 degrees) for several hours or leave it out in the sun for a really long time to dry. When it’s dry, rub spices all over it or make that fake icing with half and half white glue and white paint to drizzle over the top.
As with anything, practice makes perfect. The more you experiment with these recipes, the more creative you will become. Happy bakng!
Posted in Uncategorized | Leave a Comment »
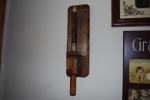
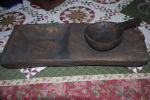
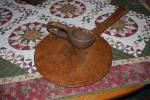
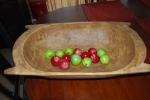
These are a few more examples of treenware that is available in Persnickety Primitives. The first picture is a wall sconce with a metal reflector plate. The second picture is a very primitive style bowl and dipper. The last picture is a large oven peel used to transport baked goods to and from a hot oven and also a small bowl with handle.
Posted in Uncategorized | Leave a Comment »
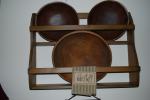
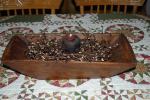
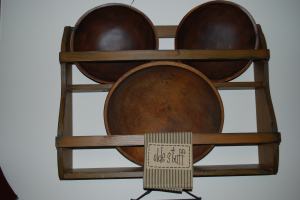
I have had several people ask, “What is Treenware”. Treenware is the old name for small handcrafted wooden items. In the old days, before everything we use was made in china or some other medium, people were far from stores and had to make do with what they had. Since the early settlers were surrounded by mature deciduous forests filled with hardwoods, there was no shortage of material from which to carve the kitchen tools that they needed. All treenware is individually hand shaped and gouged, making every one unique in its own way. Strength, durability and a pleasant shape are what make it a sought after collectible. The most commonly used woods are cherry, maple, birch, beech, and walnut. Proper care of your treenware simply means washing by hand and an occasional oiling with mineral or olive oil. The large bowl pictured in the first picture in the bowl rack is a true antique from my own collection. I have owned and used it for years and it just looks better and better year after year. It is genuine wood. Authentic wooden pieces command a handsome price these days but reproduction treenware is available at flea markets and primitive shops. The two smaller bowls in the bowl rack and the bowls in the other pictures are reproduction and examples of the treenware that will be available for sale in our line at Persnickety Primitives. Several of our pieces are made in the USA while others are imported. We have a full line of treenware pieces including large dough bowls, Nanny’s Fixin’ bowl, centerpiece bowls, scoops, sconces, peels and ladels. These are made of resin and not recommended to come in contact with food. I have them all over my house and use them for centerpieces, candles and whatever else strikes my fancy. They create such a warm feeling in your home. Add a few primitive grungy lights to your centerpiece and you have a true primitive spirit. The bowl rack and primitive tea towels are also available in the shop. Check back often for more primitive home decor items and tips.
Posted in Uncategorized | Leave a Comment »
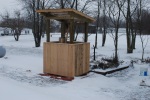
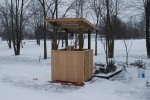
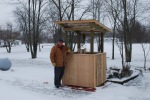
When I was a child, I loved going to visit my maternal grandparents that lived just outside of Vanceburg, KY. They are responsible (to a large extent) for instilling the love of the primitive lifestyle in me. You will hear a lot about them in this blog. They lived through the woods and on top of a hill. It was their little piece of heaven. Just outside their back door sat “the well”. Every day we would lower the bucket on the end of a rope down into the deep dark well with the pulley that was attached to the roof of the well house. The bucket was weighted slightly on one side so it would tip just right for filling when it hit the cool water as we lowered the bucket. Once we heard the bucket hit the water, we gave the rope just a little more slack allowing the water to run into the bucket. Once the bucket was full, we carefully pulled the rope hand over hand through the pulley until the bucket was at the top. We leaned forward over the side of the well house until we could reach the bale of the bucket. We would pull the bucket back toward us and let it rest on the shelf built conveniently inside the well house. Papaw kept a dipper hanging on the outside of the well house. Taking a long drink of the well’s cool water was heaven. Not only was the water refreshing, the memories that linger from those childhood days continue to refresh my mind as an adult. Recently, I have thought about that well many times. One day on one of my regular antiquing excursions, I came across an old wooden pulley in a shop. Immediately my mind was drawn back to Papaw’s well. I bought the pulley that day, not knowing what I would do with it. I just knew that pulley had to come home with me. I put it away with some of my other treasures. During the recent Christmas season, my brother, Wendell Carver came to our house for a visit. Whenever we get together, we find ourselves reminiscing about what was and dreaming about what might be. He is my brother, but also my soul mate. We dream a lot alike. I mentioned to him that I had been thinking about Papaw’s well and all of the memories it represented. As we talked, he added a few of his own memories. I shared that I would love to have a replica of that old well sitting just outside of the Persnickety Primitives cabin. I showed him my treasure (the pulley) that I had put away. We talked about what the well looked like and decided that it should look as much like Papaw’s well as possible. Wendell added that it should be made of hemlock wood so it would weather to a wonderful silver gray – just like Papaw’s well. It would also have to have a tin roof – just like Papaw’s well. The more we talked, the more we had it all recreated in our minds. I said, “You should be the one to build it.” He agreed. Much to my delight, he called me in a few short days and asked me if I had decided where I would place the well. I couldn’t believe he had it completed so soon. He and his friend borrowed a trailer and brought the well to our house and set it on some blocks. As an added surprise, he had handmade a wooden bucket with a rope handle. Such a work of art! This morning Wendell called me and said he was coming to bring the rope to place on the pulley and the bucket. He also put in two handmade pegs – one to hang the coiled rope on and the other to hang a drinking cup on. He stood back and said, “Now the well is finished.” Papaw would be proud and I have a wonderful lifetime of memories.
Posted in Uncategorized | 4 Comments »
Welcome!
We all remember special events in our childhood. Things that made us feel special that we wish we could recreate. There is something magical about reaching back in time to a place where things were simpler and much less complicated. Those special memories are what kept me grounded in a world full of turbulance. Even more so today, when life is much more turbulant with internet connections, email, twitter, facebook, cell phones, endless emails, and video games. We are constantly being beeped, bumped, twanged – you name it. So it is, we are all looking for something to keep us grounded in sanity. From this desire was born Persnickety Primitives. Persnickety Primitives is a physical location – a primitive cabin full of genuinely old and reproduction primitive decor items. We have treenware, primitive and colonial dolls, forged iron eating utensils, primitive quilts, battery operated candles, sconces, old cookware, old sad irons, old kitchen utensils, primitive pantry cakes, potpourri and rosehips, primitive wall art and samplers, shoo fly screens, candles and tarts - a little bit of everything from the primitive era. Also, I am recreating the best of my childhood. Memories that still warm my soul and spirit. This blog is intended to provide a resource to guide you into the primitive decorating style to create a warm inviting home as well as a place to learn about “the old ways”. We’ll explore things such as butter churning, baking primitive pantry cakes, coffee and tea staining paper and fabrics. We’ll also look at small antiques and collectibles and even have some available for you. Stay tuned and visit us often.



No comments:
Post a Comment